Are you going to be taking the leap and using Google Drive and/or Google Classroom with your students? My second graders got their own school Google accounts three years ago, but it took me a while to get comfortable with the interface and learn how to best help them. This past year, I felt like I knew what I was doing and also began to start creating digital products that my students could use in Google Drive, like this
Digital Editing Practice and this
Digital Writing Prompt Collection. Having my second graders work in their Drive account using Google Slides to complete these activities helped me figure out a couple more tips, and I am here to share them with you today!
These tips are based on my own personal knowledge of Google Drive, and meant for those of you who know what Google Drive is and have a grasp on the basics, but if you want to learn more there are tons of how to videos for Drive and Classroom on Youtube.com and you can find more tips if you Google the topic, or even look on Teachers Pay Teachers!
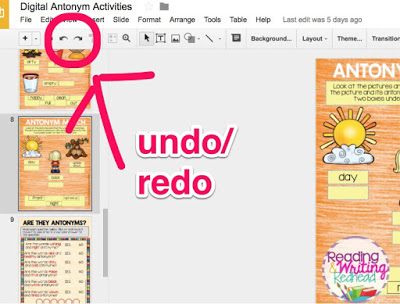
TIP 1: THE UNDO (and REDO) BUTTON
This has by far been the most valuable trick I share with my second graders. When working in Google Drive, whether in a Doc, a Slide, or anything, often they will accidentally delete a text box or moveable piece, or enlarge something or flip it. The undo button saves the day! Students can also press CONTROL-Z to undo the last action. I taught my kids to try undo first or if they were not sure what happened stop, raise their hand and I would help. Probably 98% of the time undo saved the day! Redo was also great if a student (or I) pressed undo one too many times!
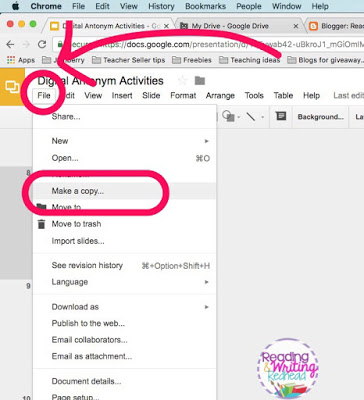
TIP 2: TEACH STUDENTS HOW TO MAKE A COPY
It is not as hard as you think for young students to to get in the routine of making copies. Many times you (or whoever made the digital resource) will share a view only copy. Students will need to understand that when the doc says “view only” at the top they won’t be able to type in it, and they can solve it simply by going to the FILE menu and choosing MAKE A COPY.
Sometimes you will download a resource and you or your students will open it and it will force you to make a copy. The screen will simply say “Make a copy of ‘Document Title'” and you will not be able to access the document until you do so. You, as the teacher, can also force your students to make a copy of any view-only item in Google Drive. Rather then me reinvent the wheel, check out Alice Keeler’s excellent explanation
here. She has tons of great information for using Google with your students too.
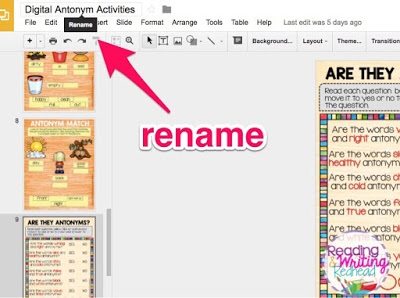
TIP 3: TEACH THEM TO RENAME ASSIGNMENTS
It will be very important for students to rename assignments, especially untitled new docs in Google Drive or anything the students creates from scratch. I try and make my kids do this FIRST. Model it and a few students will get it right away, and some will need help a few times but soon after, even first and second graders will be able to rename documents. Why should they rename? If they don’t, they will end up with a bunch of items in their Drive called “Untitled” and not be able to figure out which is which. Also, if they have made copies of a lot of items (see #2 above), their drive will be filled with things called “Copy of”. Again, this makes it a little harder to find things. As the teacher, you may also want to come up with a naming protocol for when students rename items in their Drive. I like to have them put their name in the title or put it at the top of the doc with the date just like they would when using a paper.
TIP 4. MODEL FOR YOUR STUDENTS
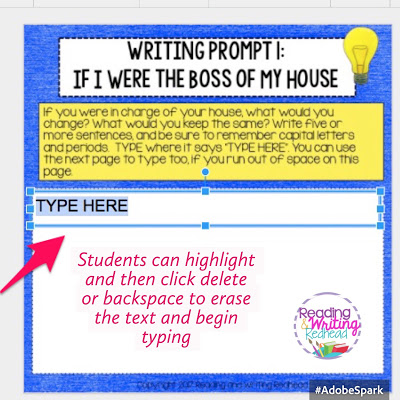
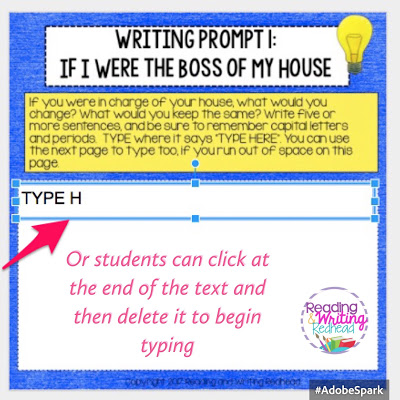
At the beginning of the year, if your students are new to Drive, or are trying a new type of activity, you will need to model, model, model. For example, something we might take for granted as teachers is click and drag. You will probably need to model click first (so the moveable item is selected) and then drag. Also you will definitely need to model how to type in text boxes in a Google Slide. Many digital resources for students have boxes that say “TYPE HERE”. Students will need to learn they need to click in the TYPE HERE box, and then delete those words (two examples of how shown below), and then will be able to begin typing what they want.
TIP 5: SHORTCUTS OR USING THE VISUAL MENU
Two of my favorite shortcuts are Control-B for bold and Control-C for center align. You can to teach them to students and model for them how to use the visual or tool bar to bold and center align. Sometimes italics and underlining is useful too but when my students were typing poems in Google Drive they most often asked me how they could center align their text (like for cinquains or pyramid poems) or bold certain words or letters (such as in acrostic poems).
TIP 6: MODEL HOW TO USE SPELL CHECK and TOOLS
Students often ask for help spelling words, especially while typing in Google Docs. You probably will want to model how to use spell check (under the tools menu). However, I encourage students to just get it down and do their “best guesses” until they are done typing. Sometimes young students or struggling spellers will still need your help because Google can’t even guess what they were trying to spell or say. Once one of my students typed “sour trout” for “sore throat” (since they are correctly spelled words, spell check didn’t know any better) , or when a girl typed “cikis” for “chickens” (Google thought she wanted to say “cheeks” or “kicks”. Students with reading challenges may struggle to read the words that are suggested in spell check too, so be sure to be available for support as they spell check or consider buddying students up with a helper or tech expert. Also, a time saver in the long run is to have students add their own names or names they use a lot to the personal dictionary. They do this by clicking Tools –> personal dictionary. Also a great resource is under the Tools menu where students can “Explore” to insert images from the web (usually there are restrictions or safeguards if your students are using a school Google account so the images should be okay (but try it yourself first and check with your tech support person). If you ever used Adobe Spark, the images search is pretty much the same.
TIP 6: MAKE THE LOGIN PROCESS EASIER
See if your school district technology assistant or expert can set up student logins so they don’t have to type in the extension, which can be very time consuming and error-laden for first, second and third graders. For example, in my district, students do not have to type in their full Google account email address, such as myname@myschool.ps.org. They only have to type in their name, such as myname. The extension is “preloaded” so it does not need to be entered. Ask about this – it is QUITE a help!
TIP 7: TEACH STUDENTS TO KEEP THEIR DRIVE ORGANIZED
Teach students to keep their Drive organized – and teach them how to create folders for different topics such as MATH, LA, etc. Did you know you can even color code folders? Check out this explanation here– it reminds me of the color coded folders in Seesaw where students upload assignments.
TIP 8: LOOK INTO ADD-ONS
If you are looking for something special that is not already in Google Drive (especially Docs), it may have been created by someone already and can be found in the Add-Ons section of Google Docs. For example, you can find a thesaurus, a rhyming dictionary and other awesome tools to help your students!
TIP 9: BE PATIENT
Be patient with yourself as you learn and become familiar of the ins and outs of Google Drive and also with your students. Young students, even 5, 6, 7 years olds can work in Google Drive, but just like us they need to practice. However, you may find a couple kids that pick up on it really quickly!
TIP 10: WHO ARE YOUR EXPERTS?
Which leads me to your final tip, tip 10. Who are your experts? Within two or three sessions of Google Drive in the classroom you will know which students just “get it” (or maybe their previous teacher told you he was the Tech Expert in her class!). Tap into that, and enlist those students to be informal or formal helpers to others! It is great for self esteem and I find often those kiddos are better and quicker at helping peers than I am. I love when I get over to a student who had raised their hand and she says, “Oh I am all set. Joey helped me.” Yes!
Thanks for checking out my tips and tricks and let me know if you have any tips or tricks of your own or a question!
By the way, I took screenshots for this blog post from a couple of my digital resources for Google Drive and Classroom which can all be found at my
TPT Store general link. If you want to look at all of the digital resources only, click
here. Specifically, you saw screenshots from my
Digital Writing Prompt Collection and my
Digital Antonym Activities. Click on the image covers to get more details!